

There is always a lot of interest and much discussion about the topic of polo bits and bitting your horses correctly.
And I was asked by a friend to write about my thoughts on the subject, in particular regards to the Levantador or Argentine Gag.
"But we're going to discuss far more..."
Here are the Topics we will Touch on:
- Firstly - We're going to expel some misconceptions about the "Levantador" or Argentine Gag.
- Then - I'm going to run through the actions and effects of (both) the Gag and the Pelham - plus some brilliant discoveries and advances that have been made with each of them.
- And Lastly - You’re going to get some tips on experimenting and choosing the right polo bits for your horses.
Remember this is just my take. There are many accomplished riders out there who have other valuable information to share and possibly a different approach to the subject.
So I encourage you to always be willing to listen, and to learn more.
Some Basics Before We Get Started:
Firstly, if you have watched any of my videos on training horses, either on my website, or on my Facebook page, you will have heard me go on and on about learning to ride well with strong legs and good balance.
"So that you are not hand dominant in everything you do".
Assuming that you have been for lessons, or that you are an accomplished rider; then the next topic you have to take time to study, if you want the best from your horse...
Is the action of every bit, and to know what is available.
A Perfect Bit for Every Horse:
I truly believe that there is a perfect bit for every horse - that's assuming that the horse is suitable for the sport you are asking it to participate in.
If one is aware of how each bit works, then by watching (it is often helpful to watch someone else ride the horse and observe it while it is being ridden) and feeling the reaction of the horse, you will know which type of bit to experiment with.
The horse cannot tell you when it is comfortable or not, but it can show you...
Some telltale signs are:
- a shaking head,
- a tongue over the bit,
- a pointing nose,
- a dead feeling to the mouth when you ride, to name but a few.
All these little signs tell you something, and if you know what bits are out there, you have a better idea of where to start.
Let’s be honest - You can't be buying or trying every one of the many variations one can find. (Bomber could probably correct me on this, but Bombers Equestrian has something like 700,000 variations.)
You have to narrow the search down to make it more affordable from a time and financial perspective.
But I will say.... that you should become a collector of bits, as you never know when each one might become "THE" bit for a horse.
Experiment...
You might need to also experiment with different variations of a bit before you suddenly find one where the horse feels completely different. It is a difficult feeling to describe, but it's like suddenly finding the right key on the bunch that turns the lock you have been trying to open...
Such a relief!
That all sounds wonderful in theory, but you will be asking yourself, "So where do I start".
That is the point of this article.
As Bomber himself says, the bit will only add that last 5%.
At the top levels that percentage drops to somewhere round 2%.
But nothing takes the place of the attention you place on medically checking your horse, fitting his saddle correctly, getting his teeth and feet done, etc etc, - and learning to be the best rider you can be.
3 Final Notes Before We Start:
One: Although this information is aimed towards bitting a horse for polo, many of the principles are correct for bitting any horse.
Two: I reference Bomber Nel often throughout this article. Although there are other good Bit Makers out there, I work closely with Bomber and he is one a guest experts, and so I know more about the variations and advances he has made...
BUT the actions of the bits, however, regardless of the manufacturer, remain the same.
Three: For more info on my process to finding the right bits for your polo ponies, DOWNLOAD my FREE Bitting Blueprint pdf.
Alright, let’s get started...
Bitting your Polo Pony:
There are TWO main categories of bit that traditionally seem to be suitable for polo.
The PELHAM and the GAG:
So let's start by chatting about...
The Gag:
There is confusion out there because people think that there is a difference between a GAG and a LEVANTADOR (what people think is a traditional ARGENTINE gag).
So let's put that to bed first.
"LEVANTAR" means to "lift" in Spanish, and the traditional single break (I.E. SINGLE JOINTED) gag does just that to a horse's head. It lifts it. Hence the term, LEVANTADOR.
The term commonly used in Spanish for a bridle is a "FRENO" but this term is also used for the whole bridle. This confuses things, as the bit itself is also referred to as a FRENO. However this is a general, non specific word for a bit.
So there is no "specific" ARGENTINE gag.
A "Levantador" is just a common Single Break Rope Gag.

The origin of the name, I am told, refers back many years to where someone discovered that if they put a rope through an ordinary snaffle type bit, the added leverage made the bit stronger.
The downside however was that the horse was inclined to open its mouth and gape, so they then introduced a dropped noseband to effectively gag the horse.
Hence the name, a "Gagged Snaffle".
This name has been shortened to GAG and covers any snaffle type bit that has leverage added, either by using a rope or three rings.
Making the Gag Gentler (Into a Snaffle):
Be aware that you can use any Gag as a snaffle by merely moving the bottom rein from the rope, or from the bottom ring of a three ring gag, onto the centre, or snaffle ring.
This immediately makes the bit gentler as you remove the leverage.
This means you don't have to buy both a snaffle and a gag with the same mouth piece, as you have both in the same bit.

Historically the Pelham & "Bit and Bradoon" Were Used in Polo...
But as polo blossomed in Argentina, and the level of the game improved there, players were always looking for an advantage (what's changed?), and they found that using a gag made horses much less linear and much more lateral.
Thus the birth of the gag in polo can be largely attributed to the Argentine style of polo. Hence the confusion about an ARGENTINE gag.
So, as we are talking about the traditional "SINGLE BREAK ROPE GAG", let's start talking about its specific action.
A Single Break Rope Gag has 3 Distinct Actions:
1. Pressure on the Bars - This is caused by the nut-cracker action of the single joint as its angle closes when the reins are pulled. Because the horse feels the pressure on the bars, it lifts the nose to place the bit in the gap created between the jaws as the horse opens its mouth slightly. This alleviates the pressure on the bars.
2. Lifting of the Bit in the Mouth - The rope sliding through the ring lifts the bit into the mouth. The effect of this pressure is increased by a "drop noseband", which restricts how much the horse can open the mouth to relieve this pressure.
3. Matching Downward Poll Pressure - The upward pressure of the bit will be matched by a downward pressure on the "poll" where the C1 joins the cranium. This is known as POLL pressure.
Additionally - There is also some tongue pressure.
This was wonderful in days gone by, as horses which would play in a gag became much more lateral.
However, it had a drawback:
It caused a lot of horses to point the nose and lift the head to a point where they were becoming concave in the back, with many starting to bound as they stopped. (If one watches videos of high level games in the past you will see this.)
Remember also that a hollow back means that the horse is not propelling correctly from behind, so you are losing power when you want to accelerate again, or when you want to accelerate through a turn.
Let me hasten to add though, that there are horses that prefer this bit and are very good in it.
But in the modern game one is looking to train horses that round up when they are checked.
That will get their hind legs under them, while keeping the front end slightly elevated and light (without pointing the nose) as that keeps them wonderfully lateral, light and balanced.
To me, BALANCE IS EVERYTHING.
That is where wonderful bit makers like Bomber Nel have revolutionised bitting with the experiments that they have made to bring us an infinite variation of bits, so we can find the perfect bit.
What has come out of all this experimentation is that there is A FOURTH KIND OF PRESSURE that we had not paid attention to in the past and that is...
TONGUE PRESSURE:
The two jointed bit (i.e. one that has a plate of some kind in the middle) puts pressure on the tongue.
This will cause a horse to tuck its nose in.

The length of the actual plate then varies the amount of pressure on the bars (longer, less bar pressure - shorter, more bar pressure - while single break equals the most bar pressure) so the head is lifted or dropped by varying degrees, with each different bit.
The Next Breakthrough:
The next breakthrough came in looking at the confusing message being given to a horse by the Rope Gag lifting the head, while tongue pressure was asking it to drop its head at the same time.
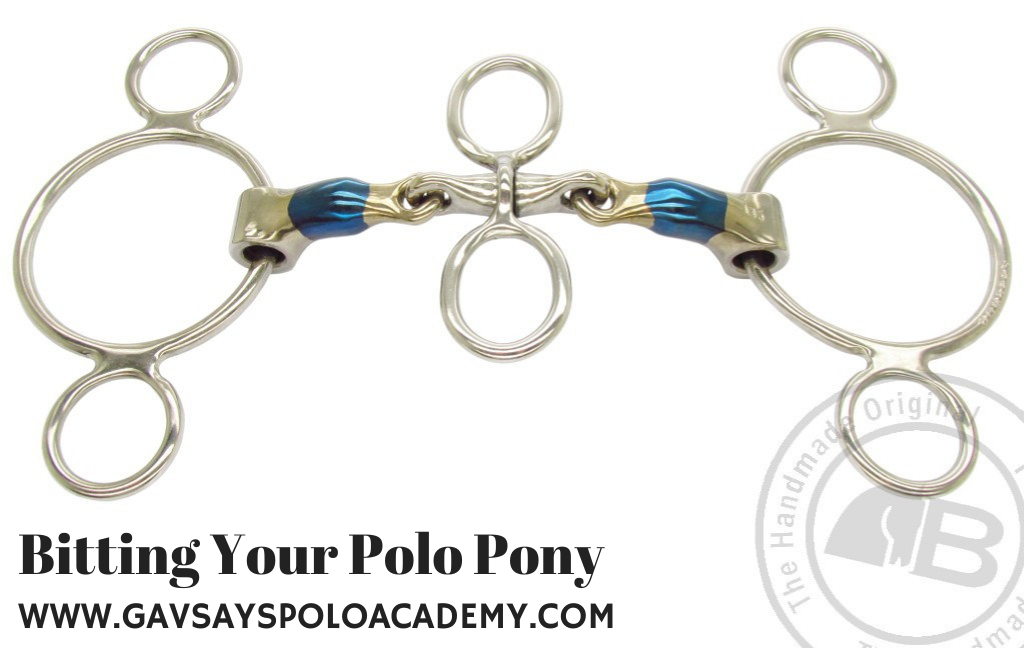
Hence the advent of the DUTCH, or Three Ring Gag, in polo.
The action of the three rings is a downward action, where the ROPE GAG LIFTS.
Both however exert POLL pressure.
Then there was experimentation with the different lengths and shapes of the plate, and here Bomber has truly excelled with a huge variety of connectors.
Surface Area & Pressure:
Remember that surface area determines the amount of pressure one applies with the same amount of force being exerted.
The different shapes of each link have varying amounts of surface area, hence varying amounts of tongue pressure, that each applies.
Some examples:
- The Control Plate. A wide long flat plate that applies gentle tongue pressure.
- The Elliptical which has a smaller surface area for more tongue pressure.
- The Buster Roller which has a shorter link that applies slightly more bar pressure to lift the head - but has a roller in the middle with a small surface area that applies tongue pressure to tuck the nose while the head is being lifted.
...To name but a few.
Then things start to get really interesting, because...
The Next Discovery:
Was that so many horses which were shaking their heads and showing discomfort, were doing so because they were tongue sensitive in any type of bit which caused tongue pressure, whether Gag or Pelham.
(The interesting thing is that so many of the tongue sensitive horses are the real super-stars when one sorts out the tongue sensitivity problem.)
The alleviation of this tongue pressure (WELL DONE BOMBER, GOOD JOB) has made so many horses far more comfortable AND PLAYABLE.
They are now not shaking their heads madly every time one touches the reins.
There are quite a few different options to help with this, however:
The "Don McHardy Tongue Relief Gag" and the "Bomber Blue Swivel" rate as my personal favorites.
For Horses That get Their Tongue Over the Bit:
The next breakthrough was when I came up with an idea that solved a problem, which was previously addressed by tying the tongue down.
Remember that tying the tongue makes it difficult for the horse to swallow.
However, the tongue HAS to stay UNDER the bit, as it is a cushion to protect the bars. When the tongue is above the bit, major damage to the horse's mouth is done.
This bit, which Bomber has made into a Gag and also a Pelham, uses a swivel to keep the tongue under the bit.
In broad outline that covers the action of the gags.
Let's move on and chat about the next type of bit...
The Pelham:
A Pelham works on the principle of a lever and a fulcrum.
If one can imagine that the fulcrum is actually the part of the bit in the horse's mouth - then the lever is the shank of the Pelham that has the lower rein attached to it.
One will also find a chain with flattened links, called a "CURB" chain. This Curb Chain passes around the horse's lower jaw from one side of the bit to the other.
The Action:
The action of the shank is to tighten the curb chain and increase the pressure of the curb chain on the lower jaw.
It stands to reason then that the longer the shank, the more pressure one can exert on the lower jaw, as longer levers help add pressure.
Think about trying to use a lever to move an object such as a rock. If the lever from the fulcrum to your hands is long, one can easily move even a large rock, where a shorter lever would make that more difficult.
What is the Purchase?
What is not common knowledge though, is that the PURCHASE also plays the same role, as this is where the chain attaches.
(This is the part of the Pelham that extends from where the mouth piece is, to where the head piece of the bridle attaches. i.e. the part of the shank that extends upwards from where the mouth piece attaches to the shank.)
The longer the PURCHASE, the more pressure one can impart to the chain. Thus if both Purchase and shank are long, the Pelham will be a very strong bit.
The Curb Chain:
The other thing that many do not pay attention to is the chain itself.
A thinner chain will be much more aggressive than a broader chain. One can also use a leather strap in place of a chain, and this is much gentler for a horse that needs a lighter Pelham.
So the action of the Pelham can also be broken down into three parts:
- Curb pressure,
- Poll pressure as the bit rotates,
- Tongue pressure.
And a certain amount of Bar pressure as well.
The Mouth Piece:
Let's chat a bit more about the Pelham mouth piece (the part of the bit that is in the mouth), as this is where the biggest changes have occurred.
Traditionally the mouth piece was either:
- Straight bar
- Half moon (Curved but with no port)
- Ported.
- Vulcanised/Rubberised
The port was designed to give tongue relief, but was so narrow that it could never perform the function it was designed for: to give the tongue relief from the pressure of the bit.
All it succeeded in doing was to exert pressure on the roof of the mouth.
Changes:
Again Bomber has come to the fore with some magic innovations that have helped so many horses.
Firstly he has made the port much wider and lower, and the horse can now actually get the tongue relief that the port was designed for without exerting pressure on the roof of the mouth.
He has also curved the bit backwards to increase the surface area, which lessens the pressure per square inch/cm.
Remember that: Pressure = Resistance, And Resistance = Loss of Control.
He has also produced the BOMBER BLUE and the BOMBER BLUE SWIVELL.

This is a non-ferrous mouthpiece for horses that don't like metal in the mouth.
These are NOT Bakerlite or Rubber, my pet hates, as these dry a horse's mouth. (Put one in YOUR mouth and taste it if you don't believe me - and then feel how your mouth dries to a prune.)
Avoiding Dry Mouth's:
All Bomber bits are made of SWEET-IRON which turns a grey/brown colour and makes a horse salivate, which keeps the mouth fresh and lubricated.
What is also interesting is the difference in temperature between a stainless-steel bit, a sweet-iron bit, and the blue bits:
The blue bits are much warmer to the touch than both sweet-iron and stainless steel, while the sweet iron is warmer than stainless steel.
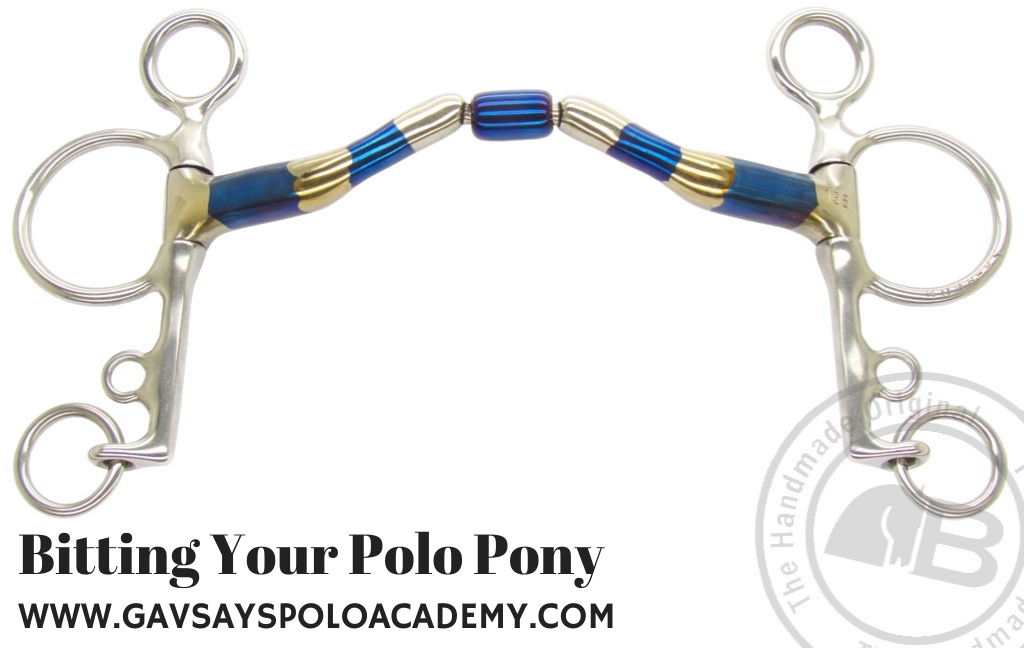
All Mouth Pieces in a Pelham:
The next huge step forward that Bomber has made has been to produce a range of Pelham's with every mouth piece that one can find in the gag format.
This is a huge step because a Pelham will usually be stronger than a gag, but if a horse does not like a fixed mouth piece (the traditional Pelham mouthpiece), one can now use the gag type mouthpiece the horse is comfortable in, with a Pelham cheek piece to make the bit slightly stronger.
And that's it for the Pelham. Now to finish off...
Choosing Your Bits:
The most important point to take from this chat is that you need your horse COMFORTABLE, BALANCED AND RESPONSIVE.
Also keep in mind, that as you experiment with the bits, the horse will tell you instantly the bits that he is uncomfortable in.
You will find however, that when you start to get close to your target of the right bit, it is so important to let the horse have some days to get used to the bit before you take him into a game situation.
You might also find that when schooling at slower speeds the horse might feel comfortable in a certain bit, but when you start to go quicker it no longer feels right.
An Example of This:
A lovely series of bitting videos was Starax's journey.
She was very tongue sensitive, and when we changed her to the Don McHardy tongue relief gag, she felt great.
We then tried that mouth piece with a Pelham cheek piece and she felt even better, to a point that I did a video showing a twelve year old child riding her.
However in a high level game this was too much bit, and the 3 Ring Don McHardy, proved to be the best when she was put under pressure.
"You have to strike a happy balance between strong enough to create responsiveness - and too strong, which causes distress, which the horse will fight."
What is Kind and What is Not?
To end this chat, I thought I would just touch on a subject that is reasonably contentious...
I hear often, people referring to a "kinder" bit.
So my question is, what is "kind" and what is not?
I can see the distinction between a "gentler" bit and a "stronger" bit, but "kinder"????
I think that many people get confused about this...
With the best intentions in the world they feel that if they put a more "gentle" bit in the horse's mouth, that they are being "kinder".
Then I see them trying to control the horse and having to reef and haul at the horse's mouth because the horse has no respect for the bit in the mouth.
Is this "kind"?
Compare this to using an appropriately stronger bit where the horse responds easily to a light touch, and is calmly controlled.
THAT, IN MY BOOK, IS "KINDER" BY A MILE.
An Important Point When Finding the Right Bit:
Not to contradict myself but a really important point to remember when you are experiencing problems and trying to find the right bit is, GO MILDER FIRST.
Remove things like drop-nosebands etc, and then add by degrees to make the bit stronger.
DON'T just throw the kitchen sink at the horse.
Often when you remove excess pressure the horse responds better.
Here the schooling you are doing is also vital.
It might be that if you just taught the horse to leg-yield correctly, it might learn to give to the bit pressure. I have done some videos showing how to teach this to get the horse to rate and travel on a loose rein, which is so important in polo.
It also does wonders for creating a good responsive mouth.
Ending Off:
I hope you have enjoyed this chat and found a few nuggets worth keeping. I encourage you to continue learning and become better equipped to Bit your Horses correctly.
Inside our Academy you get access to the full Bitting Masterclass with Bomber Nel, so if this is a subject you want to go deeper on, you should definitely join the Academy...

